We'll start with a little background. I moved from a nice little neighborhood in SCV (Santa Clarita Valley, Ca), to a shared 5 acre plot in the High Desert. At the time, I had one cat. She was getting up there in years, and only went outside, when I did. In SCV, she was allowed to go out alone...she had a nice little backyard. Out here, not so much. We occasionally see coyotes just wandering down the street (uh...dirt road) in the middle of the day. So...no unsupervised visits to the great outdoors.
The house I moved into, had a small enclosed porch. So, Dusty (my senior cat) was able to sit out there and enjoy the outdoors, in relative safety. A good friend from SCV was kind enough to donate a small dog kennel, that she no longer had any use for. I tucked that up against the porch, knocked out a hole in the side of the porch, and Dusty was able to go soak up some sun. She LOVED that. Dusty eventually passed away, but I take comfort in the fact, that she had her porch and kennel, and she enjoyed them both immensely.
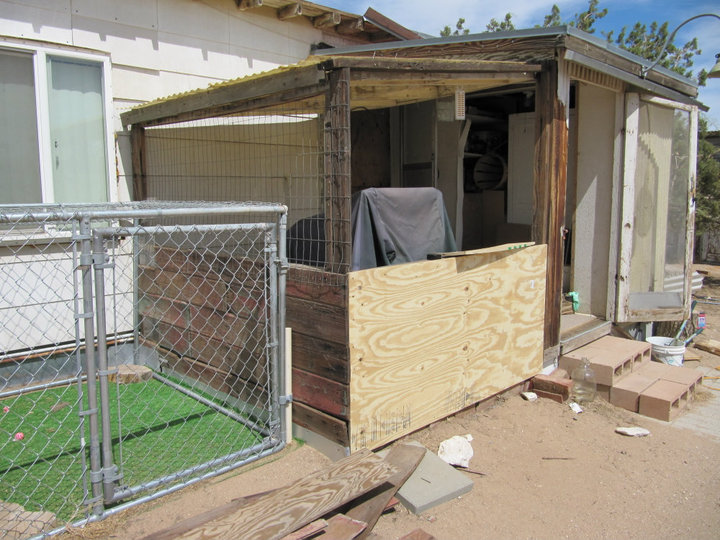
Sadly, this is the best picture I can find for a before pic. Surely I have more some place, but darned if I can find them.

This little porch also became home to a stray momma cat, and her three kittens for awhile. Momma kitty was very trusting of us, and was happy to have a safe place for her babies. There was an opening in the roof, that Mamma could use to come and go as she pleased. So, she could leave the kids at night, and go party with the wildlife. BTW, I ended up keeping that little grey kitten, and she is now a house cat. The other two orange kitties, and Momma went up for adoption. I'm not sure what ever happened to Momma, but the two orange kitties were eventually adopted.


But, the porch was starting to show it's years. The screen door was falling apart (and was barely able to close), and the wood shingles that made up the "walls" were starting to fall off in pieces. Not to mention the fencing that was used to make up the windows...the openings were large enough to let birds come in and nest. And they did.
The final straw, came when I walked out to find Mushroom (the gray kitten I kept out of that litter) intently watching something in the corner of the room. Upon closer inspection, I found that it was a baby snake, that had slithered up through the cracks in the wood shingles. He was quick, and I couldn't tell if it was a Gopher snake, or a baby Rattler. This did not please me. I needed a safe place for Mushroom to spend her time, and get some fresh air. She is a house only cat, who never goes outside.
So began the endless project of improving my porch, and turning it into a full-fledged Catio. :)
Since the frame was already there, I really only had to RE-build. Much easier. Started by tearing off those dilapidated wood shingles, and installing some nice thick plywood. I took measurements, and just had the guys at Lowe's pre-cut the plywood for me.


As
the title of my blog says...don't fear the power tools! You can buy,
borrow or even rent tools to help you w/a project. I borrowed my dad's
air compressor and nail guns. I was a bit intimidated by the framing
nailer (still am at times), but you can use an impact nailer too. It's a
bit more time consuming, but far less powerful. It's a GREAT nail gun
for anyone just starting out. I still use mine. With a large nail
gun (such as a framing nailer), it drives a nail in with one powerful
shot (sometimes too powerful). An impact nailer is more like a hammer...it "taps" the nail in at
intervals. There's very little kick to it, it's light weight, and it
just makes a little "rat-tat-tat" sound, as you use it. The impact nailers also tend to be MUCH cheaper!
Next step, was to decide what exactly to do with the walls. I needed them to hold up to the rain, sun, and wind. I decided to use roofing shingles. Yes, roofing shingles...for walls. They're fairly cheap, weather proof, and simple to install. I tacked on some tar paper, using a staple gun, and marked with a chalk line tool, where the studs (wood 2x4's that are behind the plywood) were. You need to keep track of where the studs are, so you know where to add nails, when the time comes.

 You can look online, to find help on how to install roofing shingles. The SUB title of my blog should be, "Google is Your Friend." It's my mantra. Google IS your friend. You can find help on just about anything. As you can see in the image, there is a specific way to install roofing shingles. It can get frustrating at times, but it's pretty easy, once you get going.
And voila! Weather proof walls! Only...I forgot to install skirting, before installing the shingles. And the skirting needs to slide under the shingles. Arg.
The "skirting" is basically just metal sheeting. I bought a roll of aluminum flashing at my local hardware store (generally in the roofing dept). This will keep critters from digging under the Catio & taking up residence.
 So...I had to dig ditches around the base of the Catio. This allowed me room to slide the skirting up and underneath the shingles. Then I refilled the trenches, and used a "tamper" to harden the fill dirt.
Now I was going to have to figure out how to level out the two sides of the Catio (as it sits on a bit of a hill). The one side sits so low, that critters would easily be able to dig under it...even with the skirting.


After much thought, I came up with a solution. But it wasn't going to be easy. And I would probably need to lay in bed with a heat pack for a day or so after lol. I dug a deeper ditch, measured out a large enough trench to sit stepping stones on, and spent a good deal of time leveling it out. I filled the trench with cinder blocks, added in an L shaped piece of sheet metal, and re-filled the trench. I spent at least a day, watering down and tamping down the fill dirt...then leveling it off. Finally, I placed step stones on top of the dirt and cinder blocks. Problem SOLVED!


I also added some "hardware cloth" to the windows. It's not actually cloth, it's metal. Similar to chicken wire, but a bit stronger, and with smaller holes. It's also available in a thick, strong plastic. But, I didn't care for how that obstructed my view.
Now, to improve the interior...which was looking a bit bland. I needed to install some cat walk shelves, and a kitty door, that would lead out to the kennel. And obviously...it needs some paint!


Closer, and closer. It was finally coming together! I finally got around to installing a better screen door. Got a heck of a deal on a slightly damaged storm door at my local Lowe's.


With my dads help, I would be getting a new roof too. The old one was hanging by a thread. It was made up of 2x4s and corrugated siding. I wanted a sturdy roof, that would last. So I decided to go with plywood. I'm so glad I did. It looks so much nicer, and it helps keep out the heat.

Apparently, I put off installing the roof a wee bit too long. Because, come March, we had a nasty storm. And that storm decided to remove the old roof FOR me. Ugh! My beautifully painted Catio floors! Well, I guess this way I didn't have to go to the trouble to knocking out the old roof. Thanks Mother Nature.

 Luckily, it didn't do any real damage to my Catio. Lots of dirt and rain on the floors, but I'd painted those, so it cleaned up fairly nice.
Once the weather improved a bit, I got back to work. Dad built a frame for me, and Mom helped me paint it (I hate painting). Then it was just a matter of installing it, and tacking down the plywood.
Here's a nice interior before/after shot of the roof. Guessing you can tell why it needed replacing.


I added shingles to the new roof...no small task. But don't have any pictures handy atm. I'll try to add some later.
Finally, I added a table and chairs, for myself. Along with some carpet pieces. And a repurposed kitty mailbox, that is now a Catio trash can.


I still have more plans for my Catio. This is the side that I have yet to get to. Various reasons prohibiting. I added a rope scratching post for her, and she has a small window to look out.


I'm sure I will eventually have more pictures and stories to add. Perhaps the story of finding a big ol' Gopher snake in the chain link kennel w/Miss Mushroom!
But for now, Mushroom and I are very happy with our Catio. She loves the addition of the table and chairs, and often comes in the house, to tell me that I need to come visit with her. I'm very proud of this particular project, and very happy with the results. Mushroom spends as much time, as she possibly can out there. And I never have to worry about her getting eaten or injured in this vast desert wasteland. She's happy...I'm happy.
POWER TOOLS USED:

Next step, was to decide what exactly to do with the walls. I needed them to hold up to the rain, sun, and wind. I decided to use roofing shingles. Yes, roofing shingles...for walls. They're fairly cheap, weather proof, and simple to install. I tacked on some tar paper, using a staple gun, and marked with a chalk line tool, where the studs (wood 2x4's that are behind the plywood) were. You need to keep track of where the studs are, so you know where to add nails, when the time comes.


And voila! Weather proof walls! Only...I forgot to install skirting, before installing the shingles. And the skirting needs to slide under the shingles. Arg.
The "skirting" is basically just metal sheeting. I bought a roll of aluminum flashing at my local hardware store (generally in the roofing dept). This will keep critters from digging under the Catio & taking up residence.

Now I was going to have to figure out how to level out the two sides of the Catio (as it sits on a bit of a hill). The one side sits so low, that critters would easily be able to dig under it...even with the skirting.


After much thought, I came up with a solution. But it wasn't going to be easy. And I would probably need to lay in bed with a heat pack for a day or so after lol. I dug a deeper ditch, measured out a large enough trench to sit stepping stones on, and spent a good deal of time leveling it out. I filled the trench with cinder blocks, added in an L shaped piece of sheet metal, and re-filled the trench. I spent at least a day, watering down and tamping down the fill dirt...then leveling it off. Finally, I placed step stones on top of the dirt and cinder blocks. Problem SOLVED!


I also added some "hardware cloth" to the windows. It's not actually cloth, it's metal. Similar to chicken wire, but a bit stronger, and with smaller holes. It's also available in a thick, strong plastic. But, I didn't care for how that obstructed my view.
So, my Catio was coming along nicely.
Now, to improve the interior...which was looking a bit bland. I needed to install some cat walk shelves, and a kitty door, that would lead out to the kennel. And obviously...it needs some paint!


Closer, and closer. It was finally coming together! I finally got around to installing a better screen door. Got a heck of a deal on a slightly damaged storm door at my local Lowe's.


With my dads help, I would be getting a new roof too. The old one was hanging by a thread. It was made up of 2x4s and corrugated siding. I wanted a sturdy roof, that would last. So I decided to go with plywood. I'm so glad I did. It looks so much nicer, and it helps keep out the heat.

Apparently, I put off installing the roof a wee bit too long. Because, come March, we had a nasty storm. And that storm decided to remove the old roof FOR me. Ugh! My beautifully painted Catio floors! Well, I guess this way I didn't have to go to the trouble to knocking out the old roof. Thanks Mother Nature.


Once the weather improved a bit, I got back to work. Dad built a frame for me, and Mom helped me paint it (I hate painting). Then it was just a matter of installing it, and tacking down the plywood.
Here's a nice interior before/after shot of the roof. Guessing you can tell why it needed replacing.


I added shingles to the new roof...no small task. But don't have any pictures handy atm. I'll try to add some later.
Finally, I added a table and chairs, for myself. Along with some carpet pieces. And a repurposed kitty mailbox, that is now a Catio trash can.


I still have more plans for my Catio. This is the side that I have yet to get to. Various reasons prohibiting. I added a rope scratching post for her, and she has a small window to look out.


I'm sure I will eventually have more pictures and stories to add. Perhaps the story of finding a big ol' Gopher snake in the chain link kennel w/Miss Mushroom!
But for now, Mushroom and I are very happy with our Catio. She loves the addition of the table and chairs, and often comes in the house, to tell me that I need to come visit with her. I'm very proud of this particular project, and very happy with the results. Mushroom spends as much time, as she possibly can out there. And I never have to worry about her getting eaten or injured in this vast desert wasteland. She's happy...I'm happy.
POWER TOOLS USED:
- Roofing, Finishing, Framing and Impact Nailers (and air compressor)
- Cordless Drill
- Electric staple gun
- Cordless screwdriver
- Jigsaw
- Chop Saw
- Table Saw (I hate table saws...I made my dad help with that work lol)
- Rotozip
- Electric sander
Always remember ladies...don't fear the power tools! :-)

No comments:
Post a Comment